Battery switch on travel trailer function is crucial for managing your RV’s power. Understanding how your battery switch works is key to preventing electrical issues and ensuring a smooth camping experience. This guide will walk you through the different types of switches, their operation, troubleshooting, and maintenance, empowering you to become your own RV electrical expert.
We’ll cover everything from identifying the switch type in your travel trailer to understanding its role in managing power from your house batteries and chassis battery. We’ll also delve into safety procedures, common problems, and how to perform routine maintenance to keep your system running smoothly for years to come. Think of this as your ultimate guide to mastering your travel trailer’s electrical heart!
Battery Switch Types in Travel Trailers
Choosing the right battery switch for your travel trailer is crucial for managing your power sources effectively and safely. Different types offer varying levels of control and protection, so understanding their differences is key to making an informed decision. This section will Artikel the common types of battery switches found in travel trailers, highlighting their advantages and disadvantages to help you select the best option for your needs.
Single-Pole Battery Switches
Single-pole switches are the simplest type. They provide on/off control for a single battery, typically your main house battery. They are easy to install and relatively inexpensive. However, they lack the ability to isolate the battery from the charging system, meaning you can’t disconnect the battery from the charging source independently. This can be a disadvantage if you need to perform maintenance on your battery or charging system.
Double-Pole Battery Switches
Double-pole switches offer more control than single-pole switches. They allow you to independently switch both positive and negative leads of your battery, completely isolating it from the trailer’s electrical system. This added safety feature is particularly beneficial when working on the electrical system or storing your trailer for extended periods. While more expensive than single-pole switches, the increased safety and control make them a popular choice.
Double-Pole Double-Throw (DPDT) Battery Switches
DPDT switches are the most advanced type commonly used in travel trailers. These switches allow you to select between two different batteries (e.g., a house battery and a starting battery) or to connect both batteries in parallel for increased power. This provides significant flexibility in managing your power sources, particularly useful for trailers with high power demands. They are the most expensive option but offer superior control and flexibility.
Comparison of Battery Switch Types
| Feature | Single-Pole | Double-Pole | Double-Pole Double-Throw (DPDT) |
|---|---|---|---|
| Number of Batteries Controlled | One | One | Two or combined |
| Isolation of Battery | No | Yes | Yes, and switching between batteries |
| Safety | Lower | Higher | Highest |
| Cost | Low | Medium | High |
| Application Suitability | Simple systems, budget-conscious users | Most applications, prioritizing safety | High-power systems, requiring flexibility |
Battery Switch Location and Accessibility
Finding your battery switch quickly is crucial, especially in emergencies or when performing routine maintenance. A poorly placed switch can add unnecessary stress and delay during critical moments. This section details ideal locations and emphasizes the importance of easy access for safe and efficient operation.Proper placement of your battery switch is key for convenient access and swift action in case of emergencies or for routine maintenance checks.
So, you’re planning a trip? Awesome! First things first: get yourself sorted with travel insurance. Check out this link for info on Aon travel insurance ; they’re pretty reputable. Once that’s done, you can focus on the fun stuff, like setting up your perfect audiophile travel setup – because let’s be honest, good tunes make any adventure better.
Don’t forget your chargers!
An inaccessible switch can significantly hinder troubleshooting and repair efforts. Think of it like this: you wouldn’t want to crawl under your trailer in the dark during a storm just to disconnect the battery!
So, you’re planning a trip? Awesome! First things first: get yourself sorted with travel insurance. Check out this link for info on Aon travel insurance – they’re pretty comprehensive. And since you’ll be traveling, you might also want to consider your audio setup. If you’re an audiophile, make sure to check out this guide on audiophile travel setup to ensure your tunes sound amazing on the go.
Having both sorted will make your trip way smoother!
Typical Battery Switch Locations
Battery switches in travel trailers are typically found in a few common areas, though the exact location can vary significantly depending on the manufacturer and model of your RV. These locations are generally chosen for a balance of accessibility and protection from the elements.Common locations include: near the battery itself (often in a dedicated compartment), inside a nearby storage compartment (often under a bench or in a pass-through storage area), or even within the trailer’s main electrical panel.
Some trailers may also have the switch located near the tongue, especially if the batteries are mounted there. However, a switch located far from the batteries is generally less desirable.
Importance of Easy Accessibility
Easy access to the battery switch is paramount for several reasons. Firstly, in emergency situations, such as a fire or electrical short, quickly disconnecting the battery can be critical for safety. Secondly, routine maintenance, including checking battery voltage and connections, is made much simpler with a conveniently located switch. A difficult-to-reach switch can lead to infrequent maintenance and potential problems down the road.
Finally, easily accessible switches make troubleshooting electrical issues more straightforward.
Optimal Placement Considerations
The optimal placement of a battery switch involves considering several factors. A simple diagram can help illustrate these ideas.Imagine a simple diagram showing a travel trailer. The batteries are depicted in a compartment at the tongue of the trailer. A clearly marked access panel is shown directly above the batteries. An arrow points from this panel to the ideal location for the battery switch – inside a readily accessible compartment, possibly near the entrance of the trailer.
The diagram emphasizes the close proximity to the batteries while remaining inside the trailer, protected from the elements and easily reachable without requiring tools or significant effort. This placement allows for quick access in emergencies while also providing a safe, protected environment for the switch itself.
Battery Switch Operation and Procedures

Properly operating your travel trailer’s battery switch is crucial for managing power and preventing damage to your electrical system. Understanding the process and observing safety precautions will ensure a smooth and safe experience. This section provides a clear, step-by-step guide to help you confidently operate your battery switch.
Before you begin any work with your battery switch, remember that you’re dealing with potentially dangerous electrical components. Always prioritize safety. Improper handling can lead to electrical shocks, sparks, and even fires. Take your time and follow the instructions carefully.
Safe Battery Switch Operation, Battery switch on travel trailer function
Operating your battery switch correctly is straightforward, but safety is paramount. These steps will guide you through the process, minimizing the risk of accidents.
- Locate the switch: First, find your battery switch. Its location varies depending on your travel trailer’s make and model, but it’s often near the batteries themselves or in a readily accessible compartment.
- Identify switch positions: Most switches have clearly marked positions, typically “ON,” “OFF,” and sometimes “Both.” Understand what each position does before proceeding. “ON” connects the house batteries to the trailer’s electrical system, “OFF” disconnects them, and “Both” (if present) connects both the house and chassis batteries.
- Turn off the switch: Before performing any maintenance or connection changes, always start with the switch in the “OFF” position. This ensures no power is flowing through the system, reducing the risk of shocks.
- Inspect connections: Visually check all connections for corrosion, looseness, or damage. Clean any corrosion you find with a wire brush and battery terminal cleaner. Tighten loose connections.
- Turn on the switch: Once you’ve inspected the connections and are ready to use your batteries, carefully turn the switch to the desired position (“ON” for house batteries, “Both” if needed).
- Verify operation: After turning the switch, check that your appliances are working correctly. If something isn’t functioning as expected, double-check your connections and the switch position.
Safety Precautions When Using a Battery Switch
Several crucial safety precautions must be followed when working with your travel trailer’s battery switch to avoid accidents. Ignoring these could have serious consequences.
- Wear safety glasses: Protect your eyes from potential sparks or splashes of battery acid.
- Wear gloves: Protect your hands from corrosion and potential acid exposure.
- Avoid loose clothing or jewelry: These could get caught in moving parts or create a short circuit.
- Never work on a wet surface: Water increases the risk of electrical shock.
- Ensure good ventilation: Battery gases can be harmful, so work in a well-ventilated area.
- Disconnect negative terminals first: When disconnecting batteries, always disconnect the negative (-) terminal first and connect it last when reconnecting.
Switching Between House and Chassis Batteries
Many travel trailers have separate house batteries (powering interior lights and appliances) and chassis batteries (powering the engine and other vehicle functions). Knowing how to switch between these is important for managing power efficiently and avoiding draining one battery set while preserving the other.
- Understanding the system: Familiarize yourself with your trailer’s specific battery setup and switch configuration. Consult your owner’s manual if you’re unsure.
- Switching to house batteries: To power your interior appliances and lights, ensure the switch is in the “ON” position (or a similar designation that indicates only house battery power).
- Switching to chassis batteries (if applicable): If your switch allows it, you can typically select a position to only use the chassis battery for starting the vehicle. This preserves the house battery charge.
- Switching to both batteries: Some switches allow powering both the house and chassis systems simultaneously. This is useful for tasks requiring high power draw, but it depletes both batteries faster.
Troubleshooting Common Battery Switch Issues
Your travel trailer’s battery switch is a critical component, ensuring you can easily switch between your trailer’s battery and shore power. Problems with this switch can leave you stranded without power. Understanding common issues and how to troubleshoot them is essential for maintaining your RV’s electrical system.Troubleshooting a malfunctioning battery switch involves a systematic approach, checking for simple problems before moving to more complex ones.
This usually involves visual inspection, testing connections, and finally, checking the switch itself. Remember safety first – always disconnect the negative battery cable before working on any electrical components.
Corrosion on Battery Terminals and Switch Connections
Corrosion is a frequent culprit behind battery switch problems. Acid from the battery can react with the metal terminals and connections, creating a build-up that restricts current flow. This build-up can appear as a whitish, greenish, or bluish film on the terminals and connections. A simple visual inspection will often reveal this problem.To resolve corrosion, first disconnect the negative battery cable.
Then, carefully clean the terminals and connections using a wire brush, baking soda solution, and a clean cloth. Make sure to remove all traces of corrosion before reconnecting the cables. Applying a corrosion inhibitor to the cleaned terminals can help prevent future corrosion.
Loose Connections
Loose connections are another common cause of battery switch malfunctions. Vibrations during travel can loosen bolts and nuts, leading to intermittent or complete power loss. A visual check for loose or damaged wires is important.Tighten all connections securely using the appropriate tools. If you find any damaged wires, replace them immediately. Ensure that all connections are clean and free of corrosion before tightening.
Pay close attention to the connections at both the battery terminals and the switch itself.
Faulty Battery Switch
If cleaning the terminals and tightening connections doesn’t resolve the issue, the battery switch itself might be faulty. This could be due to internal damage or wear and tear. Testing the switch’s continuity with a multimeter can help determine its functionality.A multimeter can check for continuity (electrical connection) between the switch’s terminals in the “ON” position. If there’s no continuity, the switch is likely faulty and needs replacement.
Remember to consult your RV’s wiring diagram and use appropriate safety precautions when working with electrical components. Replacing the switch involves disconnecting the battery, removing the old switch, and installing a new one, ensuring proper wiring connections.
Troubleshooting Flowchart
The following flowchart Artikels the troubleshooting steps for a malfunctioning battery switch:
| Step | Action | Result |
|---|---|---|
| 1 | Visually inspect battery terminals and switch connections for corrosion or loose connections. | Corrosion or loose connections found? |
| 2 | If corrosion or loose connections are found, clean terminals and tighten connections. | Problem resolved? |
| 3 | If problem persists, test the battery switch for continuity using a multimeter. | Continuity present? |
| 4 | If continuity is present, check for issues elsewhere in the electrical system. | Problem identified and resolved? |
| 5 | If continuity is absent, replace the battery switch. | Problem resolved? |
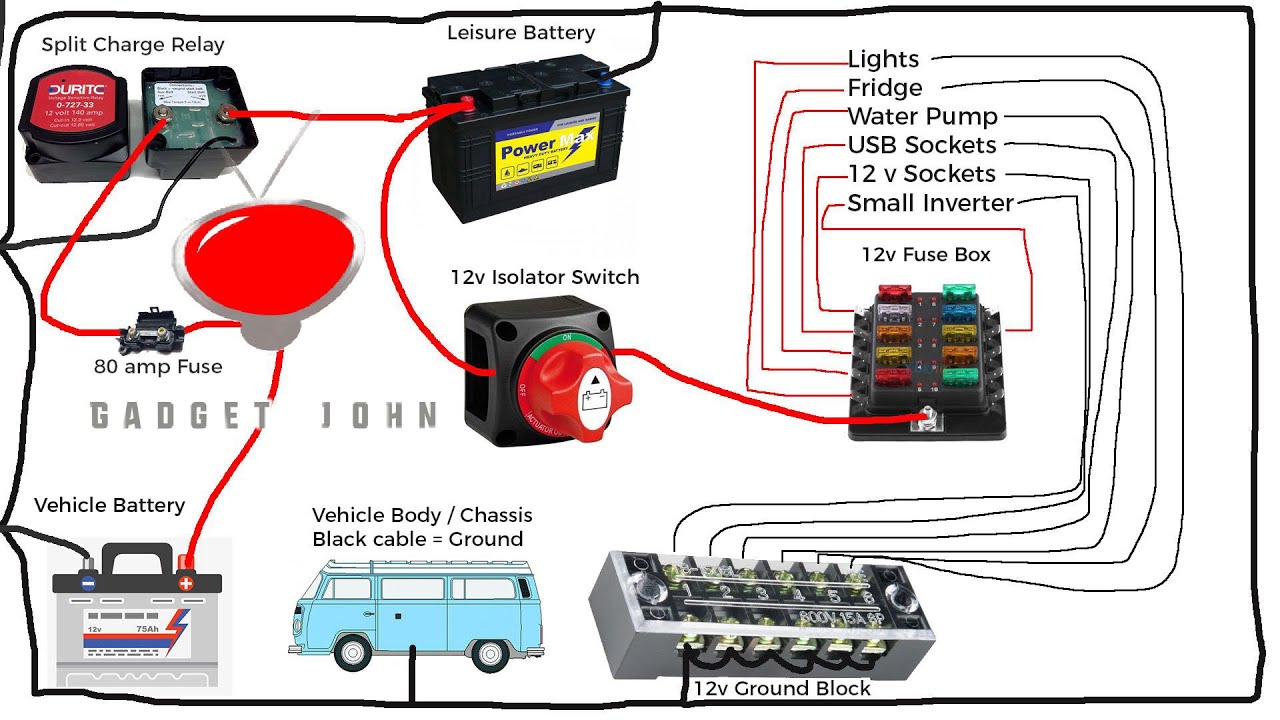
Battery Switch and Electrical System Integration
The battery switch is the central control point for your travel trailer’s 12-volt DC power system. Understanding its interaction with other components is crucial for safe and efficient power management. This section details how the switch affects power distribution and the overall energy flow within your RV.The battery switch acts as a gatekeeper, selectively connecting or disconnecting your house batteries from the rest of the electrical system.
This control is essential for preventing unwanted battery drain when the trailer is stored or not in use. The switch’s position directly influences how power flows from your batteries to devices like lights, water pumps, and refrigerators, and how charging systems contribute to maintaining your battery bank.
Converter Interaction
The converter, often called a power converter or charger, transforms 120-volt AC power from your campsite hookup (or generator) into 12-volt DC power to charge your batteries. With the battery switch in the “on” position, the converter can charge the batteries; in the “off” position, the converter will not charge the batteries, though it may still provide 12V power to other circuits, depending on its wiring.
This prevents overcharging and allows you to isolate your batteries.
Inverter Interaction
An inverter converts 12-volt DC power from your batteries into 120-volt AC power, enabling you to run AC appliances like microwaves or hair dryers when off-grid. The battery switch directly controls the power source for the inverter. When the switch is off, the inverter will not function. In this way, the battery switch acts as a safety mechanism, preventing accidental discharge of your batteries through the inverter.
Solar Panel Interaction
Solar panels generate DC power from sunlight and typically charge the batteries directly through a charge controller. The battery switch doesn’t directly control the solar panels themselves but rather controls whether the power generated by the solar panels can reach the batteries. With the switch in the “off” position, the solar panels may still generate power, but this power won’t be able to charge the batteries.
The charge controller usually prevents overcharging even with the battery switch in the “on” position.
Simplified Electrical System Schematic
Imagine a simple diagram. Three main branches emanate from the battery switch: one leading to the converter, another to the inverter, and a third to the 12V house loads (lights, pumps, etc.). The solar panel’s output is connected to a charge controller, which then connects to the battery. The battery is then connected to the battery switch.
When the switch is on, power flows freely from the battery to all three branches. When the switch is off, the flow from the battery is cut, protecting it. The converter and solar panel still operate, but their charging capability is blocked. This setup ensures controlled energy flow and prevents accidental discharge. The diagram would show a simple switch with three outgoing lines, representing the three pathways of power.
Each line terminates at its respective component (converter, inverter, 12V loads). The solar panel line would connect to the battery via the charge controller.
Battery Switch Upgrades and Replacements
Upgrading your travel trailer’s battery switch or replacing a faulty one can significantly improve your camping experience. A better switch offers enhanced functionality and reliability, while replacing a broken one prevents electrical problems and ensures safe operation. Let’s explore the benefits and processes involved.
Choosing to upgrade or replace your battery switch depends on several factors. An upgrade might be desirable for improved features, such as increased amperage capacity to handle larger battery banks or added conveniences like remote switching. Replacement, of course, is necessary when the existing switch malfunctions or shows signs of wear. A properly functioning battery switch is crucial for managing power and preventing electrical hazards in your RV.
Benefits of Upgrading to a More Advanced Battery Switch
Upgrading your battery switch offers several advantages. A higher amperage rating allows you to safely use larger battery banks, providing more power for your appliances and accessories. Some advanced switches offer features like remote control, allowing you to manage your batteries from inside your trailer, eliminating the need to crawl outside in inclement weather. Additionally, some switches incorporate integrated circuit breakers or fuses for enhanced safety and protection against overloads.
These upgrades provide improved convenience and peace of mind.
Replacing a Faulty Battery Switch
Replacing a faulty battery switch is a relatively straightforward process, but safety precautions are paramount. Before starting, disconnect the negative battery cable from your battery bank to prevent accidental shocks. Next, carefully remove the old switch, noting the wiring configuration before disconnecting any wires. Install the new switch, ensuring the wires are correctly connected according to the new switch’s wiring diagram.
Always double-check your connections before reconnecting the negative battery cable. Failure to properly disconnect the battery or incorrectly reconnect the wires can lead to electrical damage or personal injury.
Factors to Consider When Selecting a Replacement Battery Switch
Several crucial factors should guide your choice when selecting a replacement battery switch.
The amperage rating is critical; it must be equal to or greater than the maximum current your battery bank can deliver. For example, a battery bank capable of delivering 200 amps requires a switch with at least a 200-amp rating. Choosing a lower rating risks overheating and potential failure. The switch type—whether it’s a simple on/off switch, a selector switch for multiple batteries, or a more sophisticated model with additional features—is another key consideration.
Compatibility with your existing electrical system is essential. Ensure the switch’s voltage rating (typically 12V for most RVs) matches your battery system. Finally, consider the physical size and mounting style to ensure it fits in your existing installation space.
| Factor | Considerations | Example |
|---|---|---|
| Amperage Rating | Must be equal to or greater than your battery bank’s maximum current output. | A 100-amp battery bank needs at least a 100-amp switch. |
| Switch Type | Choose a type that meets your needs (on/off, selector, etc.). | A selector switch allows choosing between house and starting batteries. |
| Compatibility | Ensure voltage and physical dimensions match your system. | A 12V switch for a 12V battery system. |
Mastering your travel trailer’s battery switch isn’t just about avoiding dead batteries; it’s about ensuring safe and reliable power for all your onboard systems. By understanding the different switch types, their operation, and basic maintenance, you’ll be well-equipped to troubleshoot problems and enjoy worry-free adventures. So, next time you hit the road, you’ll have the confidence to handle any electrical situation that arises.
Happy travels!
FAQ Section: Battery Switch On Travel Trailer Function
What happens if I leave my battery switch on all the time?
Leaving your battery switch on constantly can drain your batteries, especially if you have parasitic draws from devices left plugged in. It’s best to turn it off when not using the trailer for extended periods.
Can I install a different type of battery switch?
Yes, but ensure the new switch has the correct amperage rating for your system and is compatible with your existing wiring. Incorrect installation can lead to damage or fire.
How often should I clean my battery switch?
At least once a year, or more often if you notice corrosion. Cleaning prevents poor connections and ensures the switch’s longevity.
Why is my battery switch making a clicking noise?
A clicking noise usually indicates a faulty switch or a problem with the wiring. Inspect for loose connections or corrosion. If the problem persists, consult a professional.
